
when did arteta leave arsenalbc kutaisi vs energy invest rustavi
So you can use different types of things. So plaster is a chemical reaction when it cures, it gets really warm and then it starts to cool down. Today Im gonna show you how to make plaster castings of plants. It looks like you're shopping from United Kingdom (UK) are these settings correct? More info? 
 And Im curious to see what you do with the technique.
  You can, arrange your flower to give a bit more interesting detail. Its a bit more gray when its wet. Thats the chemistry of the plaster of Paris for you. And of course the smaller the elements you choose in terms of flowers or leaves, the more difficult it is. And then the final step to make it really gift worthy will be to clean up the edges, refine them a little bit. So you want it to be a bit controlled and gentle and then hopefully, the clay is level with the top of the flower and now you have to delicately remove it. You will find ideas for home,garden,kids and holidays. And this one, I think Ill sacrifice, this one also. The bigger your piece, the thicker you want the plaster to be. And again, its coming loose really easily because of the unvarnished wood. So this beautiful texture is what you get here as well. And you dont have to get it right the first time, if it really doesnt do anything that you like, you can of course pull it out, roll out the clay again and give it another try. So using a mask will prevent you getting all these particles in your lungs, which you dont want. This will be the outline over the finished piece. This gives it double the prevention from drying out. And then from this side, we can unpeel the mold. Sometimes I find it a bit distracting from the beautiful details of the flowers themselves, a bit of a competition. And you want to think how its gonna fit in the shape of the mold like how, it will be arranged and you can cheat a little bit. And the final one, the big one, so the bigger it is, the more careful you want to be with flipping it over and handling in general, especially if you dont have a really thick layer of plaster. This one is a bit of an olive branch with the olives already hanging onto it. I press it down lightly. And its up to you, how thick you pour them. Please note: DO NOT use your rolling pin that you use for edible items or in the kitchen. So Ill do it on this side as well. So now Ive peeled off the elements, Ill fill it in with white plaster also.
  After making 4 frames and 4 ornaments and a failed attempt, still have half of the box remaining. Or you can use the same mold for more imprints. So the little white plaster that I had made in my cup is not too hard. Every week a new project is crafted and shared. If you want to do really deep relief then you want the clay to be at least as thick as that. If youre using clay that youve used before, sometimes you get like here little air bubbles, I just smooth them a bit with my finger. So show us your results, tag us on your Instagram pictures and I hope whoever receives it or if its for your own house, is really happy with it. So you can still, you know, control a little bit the details by what you leave and what you remove. It would be a shame to ruin it for now.
  So if its a look preference, thats fine, but just be really careful when handling them, especially theyre still wet, just fresh plaster, because its gonna be much easier to break.
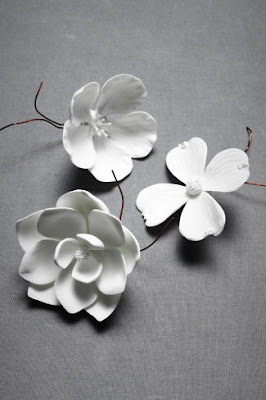

 And of course its plastic mold, you can reuse them many times so the plaster once its cured, once its hard, you remove it from the mold, then you can do a new one. This one can go here. Otherwise thats a perfect channel for the liquid plaster to escape from. If you have really tiny stems, its probably gonna be really hard to fill in those tiny stems with your layer of white. You can paint them in any color or even use color on the plants to make them stand out against a background. Use some weight on top like brick or heavy plates to press them. If you make them really thin, theyre gonna be really fragile. This step required some quick work because the plaster of Paris sets very quick. 13. This is actually pretty easy. So now I have the beautiful imprint of my mini daffodils into the clay and Im gonna use the rim of my plastic cup, this one, to push around it. I intended to not let the clay air dry and become useless for more attempts. So using textile or unvarnished wood will make it really easy for the clay to release so it doesnt stick.
  Ill just smooth it out last time before I get started. So here I have the space for my olive branch. You can call it dried floral art or botanical art whichever you prefer better! Also touched some gold paint with finger on random places and buds for a distressed look. Eventually were gonna press flowers into it so it will grab the attention with the details, not those kinds of little imperfections. I checked it by tapping the mixture to see it doesnt stick and is completely dry. And sometimes its just too delicate and then you only have one try. The leaves turned out really beautiful. Ideally I would have a bit of a thicker edge. Place the frame upside down on the dried flowers motif. Im a mom of 2 decorating and soulfully designing our home.
  And your plaster water is gonna start thickening on its own. So this is good, Ill let it harden. All right, lets see. The great part about this material is that it does set no matter how you make it. So again here I spread out my plaster evenly on the surface of the water and then you want to let it sit. In this article we will show you how to create your own plaster plant castings. So break this part off. When the plaster is wet, it will look darker than when its dry.
  I used white acrylic paint for a classic look. (plank banging). I just let the water, the plaster water flow where it will flow and then get a sort of gradient effect on edges. In the end we only, I just realized I never video tapped this room com, MINECRAFT BOYS BEDROOM Heres to the Minecraft, Some imagination at work using So excited a, Minecraft Wall Art I found these popular Minecraf. So can, you know, manipulate nature a little bit so that it goes in the direction that you want it to. And the sage leaf is what I used in that first example. And theres a bit of olive juice in the clay but I dont think thats gonna matter so much. So you really want to make sure that the plaster never goes into the drain when its liquid. people. You can try it by hand first and if thats difficult, you can also use maybe tweezers or a pin to grab them. If you have a little edge like this. I also like to take out any excess of air from the airtight sealed plastic bags to ensure it is in as little air contact as possible. So to remove your work, the easiest is to separate the different designs that you have or you just create a separate parts, flip it over and gently peel off the clay. So its fine to have overlapping leaves, but I find it works best if theyre a little bit like thinner leaves. I love to share crafts and simple ideas for home and garden. I preferred the paint look so I just brushed it up with some white acrylic paint. And then you get this beautiful relief coming from the plant itself. And so the idea after youve poured your clay, is to shake the mold. So the big olives are a little bit harder to handle. All right so the plaster has hardened, it also feels warm to the touch. I hope you enjoyed this project as much as I did making and sharing with you. So if its not flowing, if its not really liquid, just make yourself a new batch. Maybe Ill help it unfold a little bit, and sometimes you can reuse the flower, sometimes not. So its interesting, even on a small scale, unless you want to work really big, but if youre just starting out, I would keep it small, its actually easier. Of course, the size is limited to what you have. By coating the surface with oil you ensure the clay comes of the dried plaster of Paris with ease. It takes about half an hour I think. So I dont need like a really precise, hard edge between the white and the, or the painted and non-painted, well just see what it looks like. 16. Lets see if I can do it, with an alternative roller tool, my knife. So now I have plaster on my hand, plaster in my buckets or my mold. And were going to use this part with the rim facing down to contain the plaster. These ones are really stiff, really tough and the olives themselves are a little bit too mushy. Its not nothing final. So Ill push these first down and Ill see how deep they can go into the clay because the layer of clay is not that thick. 4. You can also use glue gun pad. I think Im gonna go for pink and well wait for it to cure, to harden. How to make botanical plaster casting video. So you can also reuse it afterwards for other things. So the front is not so interesting, but the back has a really beautiful texture. So here again, Im gonna fill in just the lower details and its really hard to see all the edges and boundaries for this petal. Here my plaster spilled a little bit over the edge, no big deal, I can just cut it off. You dont have to invent anything beautiful like this nature does it for you. If required remove the frame and knead more to make the clay larger than the frame. Clay (pottery clay, not an oil-based clay or playdough). Do this for all the various areas of the floral design. You want to make sure you dont make marks with your fingers or with your tools into the clay besides the plant themselves. Maybe I want to try the big olive branch. I have s, Acrylic paints in your color choice (I used white acrylic paint). Use a blade or knife to mark the borders of the frame to know your working space with flower print design. You can use this trick/ idea to imprint tremendous amount of creativity! So it will make it really easy to pop it out. Please leave your valid email address below. And so if youre taking your time and you see that the plaster is getting really too thick and not flowing anymore, thats fine. And so if she wants to dispose off plaster, you first let it harden in your container, in the, I dont know, newspaper or something that will catch the liquid and then throw away the hard pieces, but you never rinse down hard plaster. Let it settle, youll see that its gonna become a hard layer at the bottom eventually or a sludge layer. This step allowed me to reuse clay to make more molds and casting art. You want to let the water absorb into all of your powder. And with plaster, you want to clean up first. All right, it looks pretty good to me. Now, moment of truth, lets see what happens with the rolling pin and the olives when I go over them. So you want to make sure that its sturdy enough that when you shake the plank, nothing is gonna fall out. I do my powdered pigment in the water and again I do it by eye. It can contain particles which may make you sick if absorbed into the wood of the rolling pin. And you dont want to leave plaster pieces in your clay if youre gonna reuse it because it will make it really hard to smooth it out without lumps. These also look fabulous in gold acrylic paint and black acrylic paint. I just let it flow where it will flow. I bought these small sized ones from dollar store as well. All right, so these, I also smooth out a bit. And then well show you the unmolding. This one, even if its still not completely cured, I can gently pop it out the mold. So gloves and Ive done it many, many times. So you want to wait until its completely saturated before you stir it. So the first one is painted with just pure white plaster and the second one I poured in pink is a white plaster mixed with a little bit of a pigment into it. Just make sure it has a front face that lies flat on the surface. The last bit of rolling, of course, you want to make sure your rolling pin is nice and clean. I can also use a tiny bit of clay from the edge here to create a sort of edge, or seam, to put it on top. Be careful when you remove it and with soft hands place the frame, motif up and flat surface down on a paper towel. But I think the backside in this case is gonna be more interesting. 11. You just have to make sure you think of making a hole into the plaster before its too hard. I wanted to make dried plant art for my front door plant space and I find using dried flowers the best for this casting art project. So when my plaster is nice and saturated, Ill just swirl it and thats when the gloves are also handy. Its not always important to have it facing you. So a sandpaper meant for cars that kind of things, fine grit, works really well with plaster. So you dont want clay that has a lot of little pieces of whats called chamotte (grog), little pieces of hard clay inside to give it stability, but in your case, you want it as smooth as possible. So here again, I peel off the layer and you can see the details and theres a tiny bit of clay left around the edge. I have my flower now, whats the next step? You just mix a new batch and thats gonna make it much easier to fill in all your details. The color doesnt really matter. I also put gloves on before I work with plaster in addition to my mask, because its really drying for your hands. So you can just use all the details of a plant to create these little keepsakes and Ill show you how to make them yourself at home. So thats kind of the first one and then you want to sprinkle it into your water. This looks good and Im gonna make liquid plaster enough to pour all three. This way you get a neat print and there is less chance of your print moving from place and giving you a misplaced look! And this is the plastic mold. Very important, when you work with plaster, you never ever rinse it down your drain. If you disable this cookie, we will not be able to save your preferences. So this little piece of clay Ill just tap it back down. So note on safety, when you work with powdered plaster or powdered pigments, its a good idea to wear a dust mask. I have a little bit more space to get into the cracks here, at the same time Im hoping the plaster will follow the space available and I dont ever try to get it perfect. So you really need barely anything and same, a little bit of plaster. No need for fancy equipment or great skills. And so this really liquid mix, Ill just carefully paint it in the spot where I want the white to show. And then with your finger just go on the edge Dig in a little bit. Use playdoh molds, handheld tools to freehand draw or even dry food items to make cool art for your home. You will need the following materials to make dried flowers art: I bought this modelling clay from dollarama or dollar store. If I want to have a little more contrast like this, it looks a bit like the old fashion Cameo, type of jewelry that you had carved out of two colors, always pink was white. Make a mixture of water and plaster of Paris.
  Plaster always sticks to plaster. Also make sure that the clay is thick enough to have space for imprinting and rolling after placing dried flowers. So we also use plaster of Paris to cast the whole piece, but in a different color. Otherwise youll have to really drill it out with a drill bit, which is also possible. It doesnt really matter what type, because we wont be actually baking it. So that was the olive branch. Well see where I cut it off. Your email address will not be published. This way your clay is not exposed to air for longer and can be reused for making more casts. I also like to flap the sides of the clay onto the frame sides for extra precaution. So that looks pretty good. So I roll it out into a nice even slab. Ill use this one also to push it nice and deep into the clay. So that comes the part where we mix in the plaster to go around it. See this below: Here are the directions to make bas-relief sculpture dried flowers casting art or botanical art: 1. In this case, I used two different plaster layers. Just to make it easier to paint my first layer of plaster on it. 7. Have fun. This is still quite wet. This is gonna be the size that I have, I need to roll that a little bit bigger, or I can use a smaller mold, thats also possible. That would be too, but too bad to keep it only one color. Otherwise it becomes a really expensive hobby. So this is good enough and then you have to think of a mold. So a little bit of water was a tiny bit of powder and then paint in the details. There is no right or wrong amount in this process.
  In this case, it would be nice to have an even smaller rolling pin actually. So first I try to make it as flat as possible by hand and using a rolling pin, you can try to make it a nice even slab so that we can cast all our flowers in it. 25 Everyday Bathroom Cleaning tips and ideas to fo, LIFE IS ABOUT MAKING MEMORIES!
 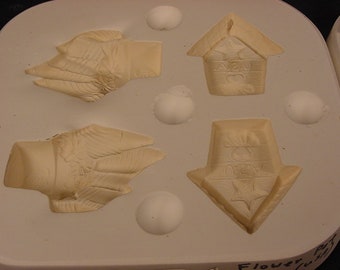 So now you see the surface is not that super even, but thats fine because were going to tap it down to a settle the plaster layer. Keep a separate rolling pin for your craft projects. And then they stick to each other.